Locanda AllePorte 1632 Default How to Enhance Our Yard Using Talavera Ceramic Mexican Pottery

How to Enhance Our Yard Using Talavera Ceramic Mexican Pottery

A slow yard is not as appealing as a vibrant, colorful one -. The fact of having full green bushes, grass, trees and more is not necessarily the finest looking and appealing garden. Among other enhancements, we should consider adding some landscape care and decor. A fountain, a stone, a diminutive hill, an artificial or natural waterfall (not eternal available, of course) and some colorful pottery will carry out the trick!

Mexican Talavera pottery is composed of several objects: Pots, planters, wall planters, strawberry pots, clay pottery, figurine pots such as chickens, frogs, donkeys, horses, boots, and a immense array of other animal figurines made into a pot. Entire of the Mexican Talavera pots posses a gap drilled at the bottom of the pot to beget water draining simple. They reach in a huge heterogeneity of sizes: Huge, enormous, medium, small and mini sizes. Of course, the actual measurements depend on the manufacturer. Speaking of such, lone of the best known brands of Mexican Talavery pottery is Fine Crafts Imports. You can locate this pot brand on Virago, Houzz, EBay, Walmart and of course on their main website.

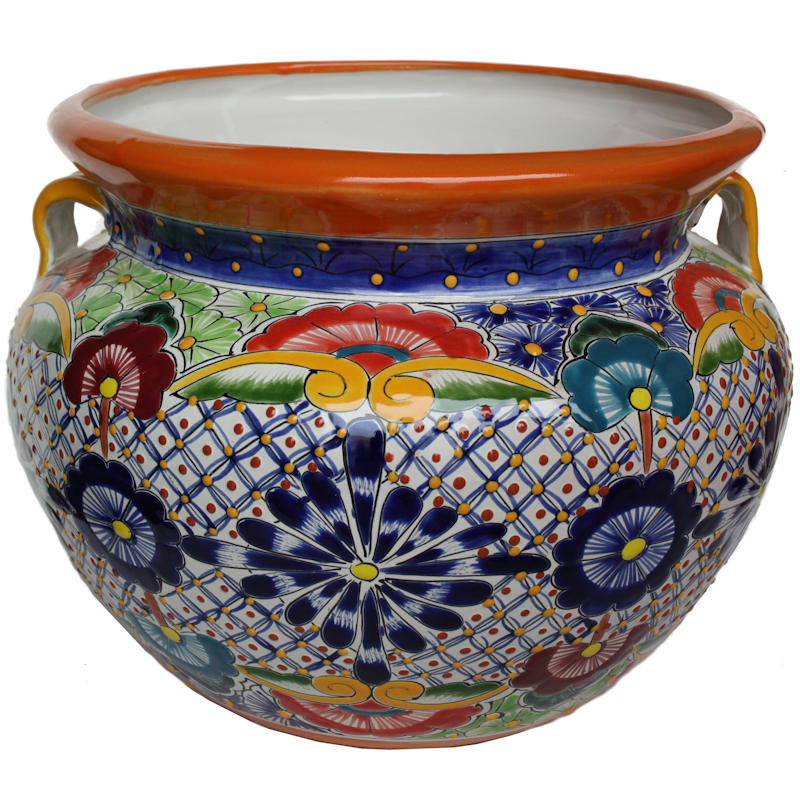
Talavera pottery is known to be composed of extremely vibrant colors, be cautious when choosing your pot because they can be too colorful if they are not chosen carefully. This, of course, depends on your home yard decor -. What colors are predominant in your garden, what colors you be fond of the most, and what size will fit your needs. Fortunately, there are some outlines that come in extremely soft and traditional colors (blue and white) that will most likely fit a wide range of domestic decor styles. Southwestern, California revival, Mexican and Spanish residence decor styles will benefit the most of these lovely products as they are specifically designed for these styles. That does not necessarily mean that a new, contemporary dwelling decor design will not benefit from the beauty of these things.

Portray using the Talavera design is an ancient trade that originated most likely in the Middle East, brought into Morocco, Italy, Spain and lately (16th century) to Mexico. Mexico is known to employ colorful glazes to intensify Mexican your place decor gave a extremely nice welcome to this technique and started implementing their own cultural ideas into the original paintings and colors.

Related Post

Are Garden Timber Cabins Rainproof?Are Garden Timber Cabins Rainproof?

Are garden timber cabins waterproof is a query we got asked all the time here at See range here .

The very short simple answer to your question is an unqualified yes!

Why would they not be?

Well,let’s take a look at some of the conceivable troubles with a timber cabin which would make the timber cabin not waterproof and quite honestly not fit for purpose.The main thing to appear at right away is the roof,that’s where you would envision the main complication would begin (this is not always the scenario but that’s where we will begin today). The main complication with the roof would be to have the felt or roof shingles to not be installed properly. This is quite easily done if this is something you have never done before and why it should always be tackled by a qualified professional most especially if you are investing a lot of your hard earned money on a timber cabin.

• Make sure that the overlaps are overliing in the ideal way. You should always begin felting at the bottom of the building and felt upwards. By doing this you guarantee that the felt overlaps on top of the piece of felt that is further down the roof. This will guarantee there is a natural run off of the water,if you begin felting at the top of the roof and you put the overlie from the bottom pieces over the top of the felt higher up when the rain runs off it will work under the felt and therefor lead to a leakage. This is exactly the same when doing shingles,make sure you install from bottom upwards.

• Make sure the overlaps of the felt/shingles are quite generous. You don’t want them to be just barely overliing because this could lead to rain to get between the felt sheets and this will lead to a leakage

.• Make sure you use ample felt nails. Ideally you want to be spacing the felt nails around 6 inches apart from each other. Always do this on both sides of the felt and dependent on the quality of the felt you are using possibly put another row of pin in the middle,possibly two rows but again this depends on the quality of the felt. Failure to put enough felt pin in there could result in the felt blowing off during a bad storm which would then leave your building exposed to water leaks.

• It is also essential that when you reach the overhang of the building with the felt you nail the felt to side of the roof but DO NOT tuck the felt under the overhang of the roof as this limits the natural run off of the water. This can lead to early rotting of the building and in some situations lead to the roof to leakage around the top corners of the building as water could build up.

• Make sure you use the correct size fixings. If the roofing boards on your building are let’s say 10mm,you don’t want felt nails of 16mm. Doing this would lead to the felt nails to come completely through the roof. This would not appear cosmetically pleasing and would also be a real chance of a leakage in the building. They way felt is now designed,there should be a watertight seal around the nail but throughout the seasons with wear and tear this may fail resulting in a leakage.

• The most typically forgotten area on a timber cabin building is the felt or shingles on the roof. This is typically because we can’t see it most of the time and it’s a lot more difficult to get up there and have a look,but this is exactly what you should do and I would suggest at least once a year or if you notice a leakage. Because timber cabins are not built as high as the normal house and the felt and shingles aren’t quite as tough and durable as a typical house tile they require a little more attention. They are exposed to more elements on a daily basis because they are lower,this can result in a number of things from falling debris from trees,or another good example would be a kids’s toys getting thrown up there which would all lead to harm to the felt/shingles. Not to mention lots of bird excrement can rot the felt if it is in an area where natural rain can not pass through it to create a natural run off and cleaning system (for good example if your timber cabin sits under a tree).

timberdise garden log cabins install all of our timber cabins,we do this because we know you are investing a lot of money into a timber cabin and you want it to be around for a long period of time. So the best way we can guarantee this takes place is to take care of the installation and make sure it is installed properly. We’ve been out to repair timber cabins in the past built by non-skilled people and if the building is not put together properly then number one it won’t be safe but also it could lead to a failure in the building to be waterproof.

A prime good example of this would be that the timbers haven’t been built properly on the walls. This would then lead to the timber cabin to differ from the design as it was intended to be. At this point when the roof was installed there might be gaps between the roof and the wall. Gaps could also appear on the walls of the timber cabins themselves and in some situations if the initial build of the timber cabin was so bad you would have no choice but to take down the timber cabin and reconstruct it.

This is why View our products install all of our timber cabins so you don’t have this to worry about. As you can envision if there is a gap in the wall or a gap between the roof and the wall this would leave the log cabin open and it would most definitely leakage which is what we want to avoid at all costs.

I also want to bring attention to the flooring a second. Having your timber cabin installed on a proper ground base is a must. That could be a Timberdise ground base,concrete base or a paved area. As long as they’re flat,level and solid you should be ok. Be mindful of where you put the log cabin,don’t put it at any place that is at risk of flooding as just like the house that you live in. If the water level rises and there is no getaway for it then the timber cabin will flood,that is regardless of how thick and tight your timbers are.

Lastly let’s talk about sealants around the windows and doors. Make sure after you have treated your log cabin you fit the relevant sealants around the doors and the windows. The cabins don’t come with these fitted as standard,this is so you can treat the log cabin first and then apply the sealants afterwards. By not fitting the doors and windows with sealants then there’s a chance rain could pass through the inside of the log cabin,which again is easily fixed by applying sealants.

In addition,at times most especially during the winter months,condensation can materialize inside a log cabin. This is normal due to the cabins not having any insulation fitted,it is not a leakage and can be quite normal. We encourage at Timberdise to get a dehumidifier if you have power access in there and leave it working during the chillier months. This will help take moisture content out of the air and further increase the lifespan of your log cabin.

If you follow all the above ideas you should have a leakage free log cabin for the duration of its lifespan which can offer endless fulfillment and relaxation.Keep in mind prevention is much better than the treatment.

What To Search For In An EMR And Practice Management SoftwareWhat To Search For In An EMR And Practice Management Software

Untitled-design-4

https://en.wikipedia.org/wiki/Medical_practice_management_software

When searching for an EMR (Electronic Medical Record) and Practice Management Software provider, there are many significant elements to keep in mind. Here are several key things to keep in mind:

1. Make sure the software is licensed by the federal government. This accreditation ensures that the software fulfills specified requirements for interoperability, stability, and privacy.

2. Choose a software that provides a wide range of capabilities and functionality. The more adaptable the software, the better it will be able to meet your specific demands.

3. Find a software provider that has a good track record and is known for giving superb customer service. This will make sure that you have someone to turn to if you run into any problems using the software.

4. Make sure the software is easy to use and traverse. You don’t want to be shelling out time figuring out how to use the functions you need.

5. Decide on a software that offers a free trial period. This will allow you to test out the capabilities and make sure it’s the appropriate fit for your practice before committing to a long-term contract.

When it comes to practice management software, you should look for a few key features:

Scheduling capabilities

The software should be able to help you handle appointments and plan patient trips.

Billing and invoicing

The software should be able to tackle your billing and invoicing demands, so you can get paid quickly and efficiently.

Reporting

Practice Management Software

The software should provide reporting functions that present you ideas into your practice’s effectiveness.

Customer support

Choose a software provider that presents great customer support in case you run into any troubles using the software.

Free trial

As with EMR software, it’s a good idea to choose a practice management software that gives a free trial period. This will allow you to check out the features and make sure it’s the appropriate fit for your needs before committing to a long-term deal.

What is the most crucial info that an EHR practice management software program would deliver?

There are many significant characteristics that an EHR practice management software program would give. However, the most vital info that the software would give would be the patient’s medical history. This is because the medical history is vital to make sure that the patient will get the proper care and treatment.

A comparison between EMR and practice management software?

All medical practices need both solutions to function properly. However, there are some variances between the two types of software. EMR systems are used to keep patient medical information, while practice management software assists practices to take care of their organization.
In conclusion, the most vital details that an EHR practice management software program would deliver is the patient’s medical history. This is crucial to make sure that the patient gets the proper attention and treatment. Furthermore, the medical history would also be useful in case of an emergency. Practice management software is a type of software that helps practices to handle their small business, but it does not offer as much depth as an EMR system.

The Importance of Sand Traps for Well Testing

The Importance of Sand Traps for Well Testing

Sandtraps are employed to avoid contamination of the sample during well tests. Whenever examining a well, samples are taken at different depths to determine if there’re any difficulties with the water quality or contamination. Nevertheless, this can’t be simple if the well isn’t clean and free of other substances such as oil and gas. Sand traps can keep foreign materials from getting into the sample line, and they can help to prevent issues like this. This will allow you to get a good idea about your well’s situation since the water being tested is free from any contaminants. Allow me to share a few of the reasons you should be making use of sand traps in your testing:

Stop Contamination

The sand trapping system allows the trash to have the ability to escape out of your by flowing freely through your pipes and into your sand trap. When you are done with dumping the trash out, simply remove the cover, and begin with the trap. The water being analyzed may be contaminated by minerals, sediments, and various other things found in the soil surrounding it. As well as when you do not have a sand trap, these specks could end up with your test sample. Nonetheless, when using a sand trap, the water passes via a filter before entering the sample bottle. This filter keeps out any particles that could impact your results.

Lower Costs

Sand traps could be one of the best cost-cutting techniques available. These sand traps tend to be much less expensive than hiring a drilling specialist or operator, so that you can save quite a bit of dollars. This is because these specialists and operators charge ridiculously high costs for their services. Sand traps will get rid of the need for you to employ them when you’ll be using this technique, because they do not have to be on the property at the time you make use of them.  At Well sandtraps you can rent such equipment as opposed to buying it.

Effortless Setup

These trap sands are not hard to utilize and set up. These sand traps require no special equipment or tools to set up or use. All that is needed is a basic knowledge of exactly how these methods work, and how to set them up and run them properly, all while performing well-testing operations.

Testing Well Pressure

Well pressure checking can be the most typical use for sand traps. When you’re testing the pressure, it is crucial to understand that the greater the water level is, the lower the pressure will be. An appropriately fitted sand trap will allow you to gauge the amount of pressure your well has with its current levels of water and dirt. The experts at know exactly what’s required so give them a call.

Increase water flow

Yet another daily usage for oilfield sandtraps, which is used to enhance the Water Flow in an existing system or in newly drilled wells. Wells can easily become blocked up with dirt that collects and blocks the outflow of the pump and filter system, causing them never to create enough water. The sand trapping system enables this debris to have the ability to escape out of your home’s plumbing system by flowing freely through your pipes and into your sand trap. When you are done with dumping the debris away, just remove the covering, and begin over the trap.

Sand traps for protecting

The well the primary purpose of sand traps is to protect The well from contamination. There are lots of fluids that can end up contaminated, including development fluids, drilling mud, along with other fluids that are created during production or testing. Sand traps are placed at the base of the casing to capture any debris or sand that is dripped onto the fluids. This safeguards the well by keeping it clean and safe for usage.

They’re protecting Well Casing. The casings are manufactured of fiberglass or steel and have to be strong enough to resist pressure from downhole formations. If the structure gets instabile, though, or there is a chance of earthquake, the casing might fracture. When this takes place, it can lead to severe problems for humans and the environment surrounding them. Sand traps can prevent this from taking place by capturing potential fractures in their tracks before they become a bigger concern for everyone involved.

In Conclusion

Sand traps are used in order to prevent the well from entering the production phase, and well. Sand traps are also used to protect the equipment of a properly, and to prevent trouble for the well. This unit is made to keep debris from going into the wellbore, together with sand, out of the way. This unit may be utilized for a number of things and it has numerous meanings. It may also be used as a water storage chamber, in which water may be pumped out later to boost the production of a well. You can also utilize this device to store excess fluids from your rig or other wells. A variety of kinds of sand traps can be found today that can help you do these things and much more!